Pages

The Spring 2013 Line Up


It is that exciting time of year when hope springs eternal because it is spring.  The weather is mild and still cool.  We had a recent series of rain showers.  The mosquitoes have yet to make an appearance.  There could not be a more wonderful and more 'waiting for the shoe to drop' time of year than this.  It is great, but it won't last.

Instead of dwelling on the upcoming horror that is the summer I am keeping my sights on the current moment and reveling in the garden.  This year's garden is the best yet.  I can't wait to introduce you to the starting line up.

If you have been following this blog from last year, you may recall how we spent a lot of time and effort transforming our ceder fence garden from several six foot by six foot beds into three foot by six foot beds.  We also installed a water line down the back of each bed and installed drip hoses into each of ten beds.  Whew!  What an effort, but at least we won't have to redo the beds again since we got them so perfect...

The briefly perfect 2012 garden...


Ha ha!  Oh how naive I was to think that.  No, actually our perfect beds were not so perfect after all and this year we fixed them.  Last year we had each bed surrounded by a back pathway, a front pathway and a pathway in between each bed.  Each of these paths were about 22 inches wide.  Why 22 inches?  Because that was all the room I felt we would need to navigate and quite frankly was all the room I begrudgingly wanted to give up for something 'unnecessary' like a path.  You know, the thing you will walk down when your arms are loaded with harvest.  That walkway you will travel countless numbers of times as you attend to the gardens needs.  That thoroughfare that will become so choked with vines and abundant growth you will think malevolent thoughts of vegi-icide just so you can make your way through without tripping for the four billionth time.

Hmmm... I know there was a pathway around her somewhere...

So it turned out that 22 inches was not nearly enough room, especially between the beds and the ceder fence.  Heck, my shoulder width is 22 inches so each walk down that path meant rubbing up against the ceder fence (there was also this remnant of a fence post that was strategically placed in nearly the center of that 22 inch pathway.  A post that we were going to remove but never got around to.  A post that was about thigh high, the exact height which can be measured by the scars of where I rammed into it on at least half a dozen occasions leaving wounds and many more torn pants, torn shirts and narrow misses.  God how I hated that inanimate object by the end of last year...).

The front pathway of last years beds became lost in a vegetable haze of overgrowth from the garden beds met by Bermuda grass from the lawn.  Walking that path meant sliding along the dog fence and hippity hopping over vines, plants and tall weeds.  Some places you would just have to detour up an in-between path to the back path before you could proceed up the front of the garden again.  Definitely a cartoon map of Billy's path from Family Circus if ever drawn out.


My husband first suggested we widen the ceder fence path.  My first response was 'but, but, nooooooo!' followed by the quick recognition of his wisdom.  We could just take out the useless front path and move the beds forward to butt up against the dog fence.  Not only would this give us a wider back pathway, but also add several inches onto the bed length.  All it meant was digging out the front path, removing soil from the back of the bed and re-framing each bed.  Hard, relentless labor?  Sign me up!

It was awful but in a mercifully limited way.  The Bermuda grass covering the front path was tenacious and difficult to get rid of.  There were thick cement blocks, about half a dozen, sunk into the ground and hard to remove.  Along several sections I had created a rock pathway, which was totally overgrown with grass.  Not only did we have to move the dirt from the back of the garden, but also pull up the water system we had so diligently installed last year.

On top of all of this work, we decided that the ceder fence path should be paved.  No more of this unsteady footing, muddy walk and treachery.  We were going to put down plastic to block the weeds and brick in that pathway.  Piece of cake!

What a back breaking cake that was.  But it is done.  Many weeks of labor later it is done, all except cementing in the bricks (check in next year when I lament my decision to cement the path and am chipping through the bricks for some yet unfathomable reason). Last year I calculated that I must have moved a whales weight of dirt and stones in my gardening efforts.  This year I am pretty sure I moved that whale again.

Ah yes.  Moby Dirt.


So we now are living the 2013 Spring Gardening Nirvana.  Here is what is different this year:

The ceder fence pathway:
No longer will we have to lurch through a too small area encountering wayward fence posts and muddy footing.  It is about 3/4 done and just needs some quick set concrete swept into the spaces, a sprinkling of water and viola - our garden super highway.


The back 40:
This was the last untamed land of our garden as it looked in 2012.  Clumps of clay filled gumbo soil, tough roots, resilient weeds, and piles of rock were all that grew here.

What a difference a ton of backbreaking labor can make!

In addition to several new beds, this area also has strategically placed stepping stones to aid in squash vine navigation...

and a drainage system to keep it from getting boggy.


18 garden beds:

I think we may have finally maxed out our garden bed potential this year.  Although, next year we may find a way to put a bed in some underused corner of our yard - or who knows -  maybe even start gardening on the roof. 


Sand:
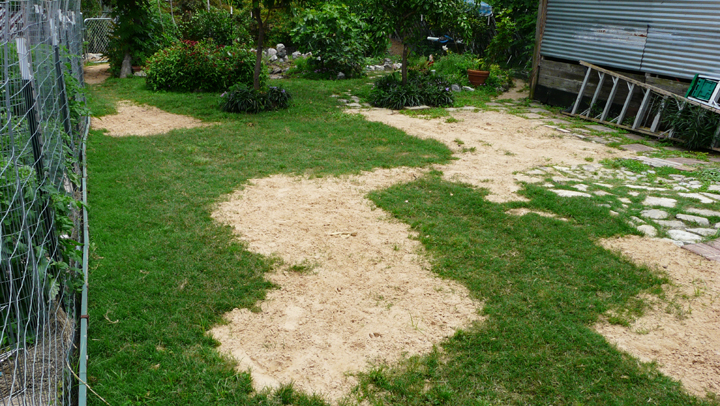
We needed some sand to help fill in some low areas of the yard and also use as a soil amendment.  We figured that we needed around 4 yards of sand.  However, upon checking with a local 'sand dealer' we were informed that the only amount of sand we could have delivered was 8 yards.  So after some internet research we found that an 8 yard pile of sand would easily fit in our front yard and we (meaning my husband) would have only about 50 wheel barrow loads to bring around to the back.  Okay - let's get some sand...

Well, about 30 wheel barrow loads served to fill in some low spots and even out most of the back yard.  This made no appreciable dent in the hulking sand pile in our front yard.

90 wheel barrow loads later and there are still about 20 more loads left in the pile in the front yard.  We have this chest high sand berm along the back yard fence, along with the two other piles taking up space in our compost area.  Suffice it to say, the sand company was very, very generous in their delivery quantity and it is likely we will have all the sand we could possibly need for the rest of our lives.


A cooler spring:

Based on the photographic evidence from last year, our cool spring is having a dampening effect on our vegetable crop.  We have not lost any plants due to freezing weather and most lows were in the 40s.  We had several weeks where the temperatures did not rise above 70 degrees.   I could see some minor leaf damage, but overall nothing seemed to be strongly effected.  Then I took a look at my pictures and found some shocking comparisons.  We planted at the same time last year, but by this time in 2012 I had already harvested my first crop of green beans.  This year the first tiny little beans have just set.  Last year the tomatoes were already bigger than my fist, but this year they are about golf ball sized so far.  The butternut squash had a large sized fruit in April 2012.  This year it is yet to start blooming.  The worst effect seems to be on the okra plants.  Leaf size last year at this time was triple the size of the leaves of the 2013 okra.  The little plants look as if they have been in some sort of suspended animation.

The good news is that the plants are all doing very well and I am pretty sure they will catch up as soon as we have warmer night time temperatures.  Don't get me wrong.  I personally have been enjoying the cool weather and it has allowed me to do far more in the garden with far less personal suffering.  It is interesting though how much difference there is in the plant growth.

Coming soon - an in depth look at this years garden participants.

Happy Gardening.

Mystery Squash


It was a vegetable mystery.  It crawled under our fence from some neighbors yard and set up shop in an otherwise desolate area of our garden.  Somehow, despite the heat, despite the lack of rain and despite the hard packed cracked earth, this plant seemed to thrive.

That it was a vine there was no doubt.  It sprawled in abundant viney growth.  Its tri-pointed leaves were dark green with strange lighter almost silver spots.  It had plenty of blooms, but they all seemed to be male blooms without a single fruit to let me know just what it was.


Since it was the hot time of year and since the thing was far away from the part of the garden I was actively gardening in, I mainly ignored it.  I thought about it a little, especially when I first saw its strange silver dotted leaves because I initially worried it had some sort of powdery mildew that could bother my plants.  Closer inspection showed the lighter areas were just the nature of the plant.

Other than noticing it, I pretty much forgot about it.  Fall came and when the heat broke the mystery plant was quite entrenched in our yard.  It seemed to have multiple rooted areas so it did not matter if one part of the vine was cut or crushed.  The other parts being rooted still thrived.  I searched again for any sign of a female bloom.  Just what was it?  A squash?  A melon?  I figured it was something growing outside of its element and the conditions would just not let it reproduce. 

Then in late November I found some fruit.  The plant had been growing so vigorously that its leaves hid large patches of where it was growing.  I found three round fruit with dark green and mottled rinds.  They were all different sizes, but the largest was about seven inches across. 

It did not look like any squash I had seen before but it also did not look like a melon either.  I could not tell if the fruit was ready to harvest or not.  If it was a squash then was it a winter variety or an overgrown summer squash.  If it was a melon, just how big would it get and how would I know if it was ready to harvest.

I resolved to harvest the next weekend.  That day came and I forgot all about the mystery fruit.  In fact three or four weeks passed and here it was now December.  I went out again and this time harvested the now soccer ball sized fruit.

Melon or squash?  A few days later we cut into it and found out it was a squash.  It was very firm like a winter squash and very tasty as well.

But exactly what was it?  I searched the internet for green round squash and several candidates came forward, such as Eight Ball squash.  However, the description of that squash did not totally match the plant we had.  Still not quite sure what we had, but encouraged by its growth and taste we saved and dried the seeds to plant the next year.


Strangely enough, some parts of the 2012 plant were still growing in the garden as we prepared the bed for our spring 2013 garden.  We maneuvered these plants into a bed and planted seeds as well.  The seeds sprouted with near explosive vigor.  This plant was eager to be a part of our lives.

I just kept referring to it as mystery squash in all my journals, but today the mystery has been solved.

It is the Tatume (Calabacita) squash.  This open pollinated squash hails from Mexico and it is considered both a summer and winter squash.  This means you can harvest it when it is small and the skin thin or you can wait for it to grow into a pumpkin sized hard skinned squash.  It is very hardy and seems to be resistant to squash vine borers.  From our experience it thrives in the heat (although does not seem to produce fruit at that time) and does well with little water.

I am hoping that we will find it to be a robust producer as well as grower.  It is know for its crowding vine habit and each vine can grow ten to twelve feet.  We have placed it well back of our garden to give it plenty of room.

So, mystery solved.  Welcome Tatume to the 2013 garden.  May your vigorous growth make you the squash of my dreams.

The Gardener's Pledge


Some of my earliest memories are of the gardens of my family.  I can remember traipsing through my grandfather's garden on the heels of my mother and sister with corn grown up so high I would get lost just a foot or two behind them.  I remember all of us eating baby ears of corn just picked, fresh and raw, and what a sweet taste that was.


I remember my great grandfather's garden in east Texas and how proud my great grandmother was when she showed us the towering metal cages they used to support his green pepper plants.  Plants that I now realize were amazingly tall and robust, the likes of which I have not seen since.  I remember that same trip playing in the sand near the rows of vegetables and somewhat vexing my great grandfather with my antics.  As I recall, the smoothness of the sand inspired me to pretend I was a mermaid and thus I was 'swimming' on my belly and basically getting in his way as he was tending to his garden.


My parents also garden.  Not the big vegetable gardens of my grandparents and great grandparents, but blooming plants and fruit trees and fragrant bushes and also the occasional small vegetable garden.  Many of these family gardens have been successful and many have also yielded disappointment, much like my own gardening endeavors.


What I wish is that I had been the kind of child that would have been absorbed in my great grandfather's incredible garden and have more than just minor glimpses into how he was so successful.  I wish that when I had the opportunity to observe my step-grandfather's incredible garden I had been more questioning about the why and how of it all.  I wish for more of their knowledge to bolster my own gardening progress.  I especially wish that I had found out how my great grandfather grew those enormous bell pepper plants, so robust, dark green and tall (mind you, four year old children generally don't question their elders about compost, caging and care of vegetable plants.  Not when there is such excellent sand to swim in...).


So here I am with some memories and a few insights gleaned from my family history of gardening, mostly learning from my own 25 years of mistakes and successes in organic gardening while I plan and implement this years grand organic vegetable heaven. Last year was a good year and many, if not most of the things I attempted to do in the spring garden worked well.


For example, last year with just six tomato plants I harvested 50 pounds of tomatoes in one month. That was just one months worth. The total amount of tomatoes harvested was... (looking back at last years calendar.... adding totals....) a whopping 90 pounds from just the spring/summer garden. I didn't even record the tomatoes I harvested from the fall garden.


And tomatoes were only a small part of the yield. There were cucumbers ( 65 pounds ) peppers ( 7.5 pounds from just 2 plants ) green beans ( 13 pounds ) squash ( 12 pounds ) okra ( 10 pounds ) figs ( 29 pounds ) and sweet potatoes (63 pounds). There were also lesser amounts of things like onions, cabbage, turnips, basil and lettuce.


Most of the harvest was done throughout April, May and June and then a smaller amount of things in the fall October and November. So basically I am saying that last years garden was a success in many things and could have been better in other things. I am planning for this years garden to be even better.
 
There is just one small troubling thing.  My current activities are forecasting my future activities. For this to all work out I have to make a commitment to the garden. A pledge if you would that will guide me and possibly others into the potential success of organic gardening.

The Organic Gardener's Pledge

1. I solemnly swear that I will plant only the things I will eat. 
(Unless of course it is something my dogs will eat, then I can also plant that. Or maybe something I think I will eat because it sounds like it would be good. Or maybe I have eaten something like it or it sounds like something I should eat.)

2. I pledge to not over-plant my garden with too many plants in too small of an area. 
(Unless of course it looks like it will fit right now when all the plants are so small and the garden area looks so empty. And of course since the plants came with three or four to a cell and what am I expected to do with the extras? Just kill them? Those poor baby plants who didn't do a thing wrong in this world except sprout? And do the instructions really mean that you have to have 36 inches between the rows? I mean, that is three whole feet and my garden beds are just seven feet long. Do they really expect me to only put in two of these in a seven foot bed? And after all there is this thing called square foot gardening which if I recall slightly, was about putting a whole bunch of plants together in a square foot area and they all do just fine and even the weeds can't grow because they are so densely packed. And after all, I don't want to limit the harvest just because I haven't planted enough. And wasn't I just skimming the Rodale's Organic Gardening book for the seven thousandth's time and dimly recalling how many plants it takes to feed a family.)

3. I pledge to water and weed my garden daily. 
(Unless of course I don't have time this morning and then I will do it this afternoon. Unless this afternoon it is too hot or I am too tired and then for sure I will water it first thing in the morning. And after all the weeds are really not a problem when they are small and I can do a whole lot in a little time, so why fuss so much every day.)

 4. I pledge to amend the soil and fertilize with fish emulsion as well as bone meal and compost as often as the garden needs it.
(Unless of course I forget to amend the soil prior to planting. And you don't actually have to amend the entire bed. Planting the plants in a deep hole in the bed you have filled with pure compost works fine. Bone meal can be sprinkled around each plant. And fish emulsion has to be made up in two or three gallon batches which then have to be portioned out to each plant - times all the plants - and maybe some of them don't actually need as much. And maybe this fish meal I just got this year will work as well or better than the fish emulsion as long as the opossums don't dig up the plants trying to get to the tasty, tasty fish emulsion.)

5. I pledge to trellis and tie back all the tomatoes, cucumbers and peppers to keep the from blocking pathways or shading other plants. 
(Unless I don't have time for that. And really I can just prop them up a bit for now and tie them up when I find wherever it is I hid the string. And tomatoes really are a vine that can grow along the ground and they produce fruit just fine as long as you don't mind the occasional slug bite. And once they have overgrown you practically have to perform some sort of martial arts round house kick to get them to let go of what they are currently adhered to in order to tie them to what you want them to ride up (I am talking to you cucumbers!).)

6. I pledge to harvest the produce at the peak of ripeness.
(Unless we are talking tomatoes which get pecked by birds once they turn even slightly red. And you can't always find those darn cucumbers and end up with the classic cucumber baseball bat - how did something that big hide there? And what with all the watering and weeding and tying up of things just how am I supposed to find time to harvest the beans? And if we are talking figs, between the five to 9 trees that will produce figs this year who require me to get up at the crack of dawn to beat the birds into the trees - and suffer near heart spasms from the leaping grass hoppers that station themselves in the trees - and practically hurtle myself off the ladder I need to reach the tallest branches - and the fact that figs are fragile and don't pack well so just how are you supposed to process 10 pounds of figs every single day?!!)

7. I pledge to remove spent plants and maintain the beds so that each season's crops are planted and ready to go.
(Unless I just give up around late July through September because honestly, nothing is producing. The plants are just barely hanging on with wilted sun scorched leaves and saying 'Kill me...', but I am too heat sodden to even lift a shovel their direction. Wake me when it is less than 100 degrees in the shade, you know, around November...)

And so I have taken the pledge.  I will once again hurtle headlong into the spring with garden gloves on and an optimistic outlook.  Life is good.

Kitty Condo Deluxe


It is with great pride I  present to you the master planned community known forever more as Kitty Condo Deluxe.  This luxurious, exclusive, gated community features three distinct and individually decorated single room condos with plush terry interiors and optimal floor heating.  The exteriors are a delightful terry texture adding insulation and good looks.  But the fun doesn't stop inside.  The outdoor environs allow for top of the condo lounging for those warmer days and more temperate night conditions.  Super Deluxe Condo 1 even features an exterior love seat - perfect for entertaining.  

Stroll along the grounds to find the patio dining areas serving sumptuous gourmet meals three times a day.  Drink fresh from the state of the art ever full water fountain.  Relax in comfort on the grounds of this estate and feel free to pursue your favorite pastimes just steps away through two convenient doorways.

There is no place you would rather be... Kitty Condo Deluxe...


... and fade to black.

I can't believe we did it - and in record time - and without personal injury.  Let me share with you how it all went down.

Here is the space with two of the cut pieces of lumber that will support the shelf top.  That pink flap you see just to the left of center is a kitty access flap.  We will have to make sure the shop vac does not conflict with their use of this flap.

Here is the shelf top, cut to size and awaiting install.

By this point we had taken measurements from many different places in the alcove, attempting to head off the cantankerous house syndrome that means there is no area that is truly square, level or easy to attach things to.  Being veterans of past encounters we figured if we only had to re-cut things twice we would be doing better than usual.

Oh My God!  It fits!  Well in this picture it does.  What you don't see is the re-cut of the west support piece and the repositioning of the north support piece.  It is up, it is stable and can probably support over 100 lbs which means it will likely be able to withstand the potential of 40 pounds of cat.
Here is a view of the top of the shelf.  It is somewhat banged up, but no worries...

That is why they make contact paper.  Now we have a smooth, clean and above all, cleanable surface to manage the inevitable cat puke.
So here it all is put together with the two kitty condos on top and the shop vac, kitty condo and kitty bed on the bottom.  Although you cannot see it from this view, we managed to keep enough space between the shop vac and the cat flap that the kitties should have no trouble using it.


However, all of this will be for nothing if the cats don't like it.  Who knows what goes through their little feline minds that might cause them to reject this labor of love.  I have created some flyers with the above sales pitch but will the advertising sway them?  They have been completely absent from the scene the entire time we were doing the build out so it will be a complete surprise.  What if they like only one of the condos?  What if during the night they locate a cordless drill and dismantle the whole thing?  What if they burst into tears and demand we put things back the way it was?  The suspense is killing me.


No worries.  Here is Ike leading the cat appreciation front.  It happens to be hot the day we finished this (of course) so he did not venture into the condos but leaped right up on top.  Minor glitch, the condo wobbled.  It was like I was afraid of,  we really are going to have to bolt them to the table.
Here is a before and after shot:

Although it doesn't show up that well, we probably reclaimed several square feet of traffic area.  Now things are mostly contained in just the alcove leaving us the rest of the porch to walk through. Success!
Now I just have to finish putting up all the junk I removed...

Front Door Kitty Condo Plans


So, after creating an improved kitty condo for the back door cat, we felt compelled to create the improved multilevel kitty condo complex for our front door quartet.  This was going to require planning, potentially a lot of work and probably a complete redesign of whatever initial plans due to typical unforeseen complications, also known as old house cantankerousness.  The best thing about the front door Kitty condos is that the 'condo' part is already made and what we are really doing is creating the condo environs.  In other words we want to make a spot that will 1) provide easy kitty access to said condos and 2) not get in our way as we try to enter and exit via our front door.

Point number 2 has been a sore spot for us for the last 4 years of the front door cat era.  Their 'things' are always in the way be it food bowls, water bowl, cat condos, cat towels or the occasional dead animal.

The kitty 'footprint'.  Lets see cat towel, kitty condo, cat food bowls all competing with space with the human shoes, shop vac and the empty water jug a cat has knocked down.  There must be at least a foot of space for us to walk through.  What are we complaining about?  Thankfully, no dead rodent to leap over today.

This is the 'before' view of the proposed kitty condo area.  There seems to be a very small and very specific black hole in there that draws in various junk, much like a magpie might take shiny things to its nest.  That rakishly tilted towel is another signature of our fractious felines.  If it is not nailed down, they will rearrange it.

Cats are in many ways akin to teenage humans in their independence, aloofness and as we discovered, messy room ways.  We can lay out a very neat and tidy cat towel placement in the evening and by morning they have mussed it about and rearranged it to be maximally in the way of our coming and going through the front door.  They knock things off shelves and never pick up after themselves.  They have knock down, drag out arguments over who gets what part of the front porch.  They do not like to share their things with one another.  And yet, on a cold morning we will find all four of them in a kitty pile up atop their two heating pads (just a note about heating pads - some come with a 2 hour cut off which does not work because 'Kitty' wants to be warm for more than 2 hours.  I have linked to the type of heating pad that works great for our crew).

This information lets us know that while everyone needs to have their own space, they also need to have a way to cuddle together when the mood strikes them.  They want to be close to each other, but not too close.  Anything we create for them has to be sturdily attached to whatever it is resting on.  Everything we create for them has to be positioned in such a way they cannot rearrange it into the chaos they so love.

We have three kitty condos that are ready for use.

One is a refurbished covered cat litter box that is 18 inches long, 14 inches wide and 18 inches tall. It has seen better days and is probably about 7 - 10 years old.  You can see where I have taped a piece of wood over what used to be the hole for the shop lamp.  The very hole that used to be a vent for this covered cat litter box (you can find my rant about it in this post).  I plan on installing a heating pad for warmth, along with several cat towels for warmth and comfort.
One box is a refurbished storage container with a hole cut out of its narrow end.  It is 21 inches long, 14 inches wide and 16 inches tall.  I have taped a plank of wood across the top to cover the hole that allowed the lamp heat through.
Here you can see inside where I have the heating pad in place.  I will cover the heating pad with a blanket and drape blankets around the box as well.

   
The third box is an actual pet crate that is 23 inches long, 16 inches wide and 16 inches tall.  Thankfully I did not cut a hole in this one, so no tape needed.  It has its heating pad ready to go.
Here is how I cover the heating pad by nestling it inside a folded towel.
Here is how the whole thing looks with cat towels inside and out.
This one is big enough we will have room for an open air cat bed on top of it.

Now we just need to create the space for the three kitty condos and the shop vac.  The space we have available is a small alcove off the front porch that is 44 inches wide and 21 inches deep on one side and we have about 25 inches of space available on the other side.

Here is what the space looks like with all the crap removed.  Surprisingly the debridement only took about 15 minutes.  Of course now all the stuff is just sitting outside the front porch, but since the area I need to work in is clear I am chalking that up on the win column.

Here is the plan I have created for this space.

This is the view from the top showing the shelf unit we will install in the alcove.

The shelf top is 24 inches wide on one side and 14 inches wide on the other end.  We are harvesting this shelf from our workshop.  I can't remember when we last had to create anything new.  We just move the things we have already created from one place to another.  Right this shelf it is a little longer than the alcove, so we will be trimming it to fit.  The back edge we will brace against the north and west wall of the porch alcove and the front edge will have a support leg.  Below this shelf will be Kitty condo 1 on the right.  On the left side is a space for the bulky shop vac that also needs to live on the front porch.  We want to leave enough room for the shop vac to fit under the shelf without giving the kitties any unnecessary access above or behind it.


Above the shelf and resting on it are Kitty condo 2 and 3.
Kitty condo 2 will be on the right side of the shelf and since it is 14 inches wide it will just fit.  The access to the condo is through the narrow end which will give the cats about 8 inches of space between it and Kitty condo 3.  This should be ample space for them and as a bonus they can also lounge on top of this condo.  Kitty condo 3 is the tallest and shortest of the condos and will fit with its access door pointing toward the front of the alcove space.  The cats will be able to reach it via a six inch front area, which again, given cat agility should be ample room.  Although this condo is somewhat dome shaped on the top, many a cat has perched there before, so we anticipate them using it that way as well.
Both condos will have to be wired on to the shelf in order to keep the brawling quartet from knocking things asunder.  It might seem like large objects resting solidly on a flat surface would not be particularly tip prone, but these guys are a professional disruption crew and God only knows how they might do it.  If there is a way, those condos will be on the floor unless I do the equivalent of bolting them to the shelf. 

Seen from the front of the alcove.

The arrangement shows the shelf unit is positioned 30 inches off the floor, leaving enough room for the shop vac to easily be maneuvered in and out.  Kitty condo 1 rests on the floor to the right and there is quite a bit of space for a cat bed on top of it.

So that is the plan and all we have left to do is 1) deconstruct the shelf top from where it is in the shop and refit it to correct length for the alcove space, 2) install the shelf into the alcove space, 3) arrange and secure the kitty condos on the shelf, the shop vac beneath the shelf and the other kitty condo beneath the shelf, and 4) swath the kitty condos in cat towels and heat with heating pads.  Tada.  I only count about a dozen ways this will not go smoothly, up to and including complete rejection by the kitties it is being created for.

stay tuned...

Kitty Condo #1


It's that time of year again and as the chilly weather descends I once again begin to agonize over how comfortable my cats are.  They live outside and very much love that arrangement.  They are free to range around and do cat things and have a constant food and water supply along with the comforts we provide them.  We live inside and very much love not having cat dander, cat hair and the inevitable litter box inside our small house with us.  Not to mention cat poop in the dryer (a trio of incidences in our distant past which involved my currently oldest cat, two pristine, clean and unused litter boxes, an open dryer door full of clean dry towels, all mixed with the typical insanity that is known as 'cat').

Needless to say, we are not about to resolve the cold weather scenario by bringing 5 cats into our two human and two dog household.  With the Border Collie in residence we already have an organic shedding machine capable of creating virtual snow drifts of hair (dust puppies) every day.  Seriously, if you leave something on the floor without picking it up and sweeping beneath it for longer than a week an amazing raft of hair (shed-lock) secretes itself beneath the object causing involuntary flinching when said object is moved. Add five more hair contributing creatures and we have the makings of a horror flick (it lives under the chair!).

So no, I do not wish to live in a fur lined home - and again, I have no desire to increase the poop in the dryer potential...

What to do though?  The oldest cat is now 15 and prone to respiratory issues.  Previously I have used a crate like container and a spot lamp positioned on top so that the heat from the bulb would warm the enclosure.  This worked great the first incarnation when I used a covered cat litter box (now defunct with no cats living inside and thoroughly sanitized) with a hole punched in the top where there used to be a vent (let me digress just a moment here while I struggle with the idea that a closed cat litter box needs a top vent.  A closed litter box is a great idea, much like the lid of a toilet being placed in the down position when a plumbing situation would preclude flushing a used toilet.  This enclosed box that reduces the 'me seeing the nasty used litter' to near zero and the 'me smelling the nasty fresh kitty poo' to something tolerable - this perfectly fine arrangement needs... a vent?  I mean, come on, were the makers of this kitty toilet somehow under the impression that they needed to prevent the build up of dangerous kitty gasses?  Was the fact that the front of the enclosure being totally open not enough to vent the terrible, dangerous, kitty gas?  Were there a number of cat litter box explosions rocking the country that somehow I was unaware of?  Because really, exploding enclosed cat litter boxes would definitely be something the news media would be all over.  I would have heard.  So, let me be clear here - enclosed cat litter boxes do not need a top vent.)

Indeed that enclosed cat litter box not only worked great to reduce the cat litter box explosions in my life, but also worked great after a retrofit as a kitty warming box.  I had two boxes and at the time I had two cats and they worked great all winter long with snuggly warm kitties encased in towel covered and towel lined boxes.  Perfect.

But then of course, I had to go and think about it.  At the time I was using 75 watt bulbs to give off a very strong heat.  Then I ran out of 75 watt bulbs one evening (the bulbs lasted a reasonable time, but cats being who they are liked to lounge on top of the crate and would occasionally knock them off and break a bulb) so I used a 60 watt bulb instead.  I noticed this reduced the 'brightness'.  That got me to thinking - just how healthy was it for my kitties to be constantly subjected to bright light?  Was it throwing off their kitty circadian rhythm?  Did it disrupt their kitty REM sleep?  Does a creature that sleeps 20 out of every 24 hours even have a circadian rhythm or is it more of a flat line?

So I purchased an expensive red heat bulb designed for heat loving reptiles.  That solved the bright light problem and seemed to create a wonderful heat.   The cats loved it.  But what they loved more than being in the crate was resting awkwardly on top of the crate, half of which was taken up by the hood of the lamp, leaving only a small space that a very determined cat could squinch itself into.  They would climb into the crate only when it got truly cold at night.  This top of the crate perching led to that expensive light lasting only one week due to repeated cat toppling.

So I discovered that black light bulbs were less expensive, put out less light that I could see (mind you it did spark me to a fruitless internet search on what light range was perceptible to cats - uhh, better than us?...) and was very warm.  The cats seemed to do fine with this change and continued to perch atop the crate.

Thus ended that cold season and I put the crates away with just a brief foray into researching heating pads for cats.  After all they seemed to like the heat coming up from below ("Hello," my cats said - "care to notice how we awkwardly perch here?  Think that means anything, hmmmm?").  I gave up this search after finding that, 1. Yes, they did make special heating pads for animals, and 2. Special meant expensive.  And so I put it out of my mind thinking I would resolve it the next season.

Fast forward to the influx of way too many cats and cold, very cold, winter weather on the doorstep.  I needed enough warm space for 8 cats, two in the backyard and 6 in the front.  At that time we had not enclosed the front porch space.  For this scenario I created another light box by cutting holes in the top and side of a small storage container and scrounging a couple of human heating pads to go into a couple of other storage containers turned on their side.  The whole complex was swathed with bath towels inside and out.  Three new kitty warming containers for the six kitties worked just fine (here I must point out how utterly frustrating it is to have almost all your bath towels being used for the cats and the ultimate designation of certain towels being forever more labeled as 'cat towels').

But were they comfortable enough?  Thus my husband and I rebuilt and enclosed the front porch by the next winter.  They have a raised wooden floor and slowly but surely we have been finishing out the walls for greater insulation and installing a separate wall socket so we don't have to run power cords under our front door anymore.

This brings us to today and the beginning of the 2012/2013 cold weather season.  It has not gotten really cold yet and does not look like it will be very cold for maybe a couple of more weeks as well.  Me being me, I got to wondering just how comfortable my cats are again and so I have been building and scheming once more.

Kitty Condo #1

I present for you Kitty Condo #1.  This enclosure uses a medium size metal dog crate insulated with 4 square pillows inside (top, back and sides) along with a thick exercise mat between cat and pillows.

The pillows will be a total loss after this, no doubt, but delaying the need to replace the cat fouled pillow with an easier to clean barrier that also provides insulation was the brainstorm of my dear husband.
Here is the view of the top.  I secured the pillows and mat with loops of string interwoven with the metal bars of the dog crate.


I must confess that the current arrangement went through several incarnations, one of which was having one of the plastic storage crates inside the dog crate and surrounded by pillows - but that looked 'cramped' I decided after spending an hour putting the whole thing together (I don't want my wittle, bittie, kittie to be cramped!) so I dismantled it and started over.

It is heated by a large human heating pad (on low for now) which is covered by a pillow case.

A layer of bath towel also covers the heating pad to make sure the heat is never overly intense and to cut down on the need to change the pillow case as frequently as well as absorb any 'cat puke' situations.  The towel also provides additional snuggly warmth and changing towels is one of the quickest ways to satisfy the kitty's need for fresh bedding.

The exterior of the condo is covered by two thinner yoga mats, front to back and side to side arrangement.

 The outside is also covered by two bath towels.  This kitty condo allows for an interior cat space of about 16 inches high, 14 inches wide and 18 inches long.  The top of the condo is the kitty feeding area.

Mr. Dory the 15 year old seems to love, love, love it and who wouldn't.


He can stretch out, stand up, and do kitty gymnastics if he wants inside his warm dark condo.

The whole arrangement is sitting on top of a table next to my bedroom window, well outside of Border Collie nose range and well within my monitoring area.  His towels are changed once a week and his wet and dry food bowls are within easy reach but not stinking up his crate when he is done eating.  If he weren't such a loner he would probably be inviting his teenage friends over to chill in his new crib.  We are holding off on installing the flat screen TV, cable internet, surround sound audio and mood lighting for now. 

One down and now on to the front door cat comfort challenge... stay tuned.